Thursday, November 18, 2010

Joe Armstrong on optimization

Make it work, then make it beautiful, then if you really, really have to, make it fast. 90 percent of the time, if you make it beautiful, it will already be fast. So really, just make it beautiful! (from the book)

I think that people first of all write a problem, they solve the problem and then they sort of optimize this code, work on it and the code becomes very efficient but unreadable. What I think they should doing is specifying it with a domain specific language or some higher thing and then writing a compiler and then changing the compiler because it’s not efficient. Because then they would have the benefits of a clear specification and a fast implementation. What they do is they don’t keep these things separated and the language doesn’t support them separating it like that. (from the interview)

Wednesday, November 10, 2010

Erlang explained: Selective receive

If you worked with Erlang you've probably heard about selective receive. But do you actually know how it works? I want to post here an excerpt from Joe Armstrong's book Programming Erlang where he explains how it works exactly (Section 8.6, p.153):

receive
    Pattern1 [when Guard1] -> Expressions1;
    Pattern2 [when Guard2] -> Expressions2;
    ...
after
    Time -> ExpressionTimeout
end

  1. When we enter a receive statement, we start a timer (but only if an after section is present in the expression).
  2. Take the first message in the mailbox and try to match it against Pattern1, Pattern2, and so on. If the match succeeds, the message is removed from the mailbox, and the expressions following the pattern are evaluated.
  3. If none of the patterns in the receive statement matches the first message in the mailbox, then the first message is removed from the mailbox and put into a "save queue." The second message in the mailbox is then tried. This procedure is repeated until a matching message is found or until all the messages in the mailbox have been examined.
  4. If none of the messages in the mailbox matches, then the process is suspended and will be rescheduled for execution the next time a new message is put in the mailbox. Note that when a new message arrives, the messages in the save queue are not rematched; only the new message is matched.
  5. As soon as a message has been matched, then all messages that have been put into the save queue are reentered into the mailbox in the order in which they arrived at the process. If a timer was set, it is cleared.
  6. If the timer elapses when we are waiting for a message, then evaluate the expressions ExpressionsTimeout and put any saved messages back into the mailbox in the order in which they arrived at the process.


Did you notice the concept of "save queue"? That's what many people are not aware of. Let's play with various scenarios and see the mailbox and save queue in action.

The first scenario is simple, nothing to test there in regards to mailbox. The second one is also straightforward:

1> self() ! a.
a
2> process_info(self()).
 ...
 {message_queue_len,1},
 {messages,[a]},
 ...
3> receive a -> 1; b -> 2 end.
1
4> process_info(self()).
 ...
 {message_queue_len,0},
 {messages,[]},
 ...

You send a message to the shell, you see it in the process mailbox, then you receive it by matching, after which the queue is empty. Standard queue behaviour.

Now let's test scenario 3,5:

1> self() ! c, self() ! d, self() ! a.
a
2> process_info(self()).
 ...
 {message_queue_len,3},
 {messages,[c,d,a]},
 ...
3> receive a -> 1; b -> 2 end.
1
4> process_info(self()).
 ...
 {message_queue_len,2},
 {messages,[c,d]},
 ...

Again, no surprises. Actually, this example demonstrates what people think when they hear about selective receive. Unfortunately we don't see what happened internally between lines 3 and 4. We are going to investigate it now by testing scenario 3,4.

This time start the shell in distributed mode so that we can connect to it later from the remote shell.

(foo@bar)1> register(shell, self()).
true
(foo@bar)2> shell ! c, shell ! d.
d
(foo@bar)3> process_info(whereis(shell)).
 ...
 {current_function,{erl_eval,do_apply,5}},
 ...
 {message_queue_len,2},
 {messages,[c,d]},
 ...
(foo@bar)4> receive a -> 1; b -> 2 end.

At this moment the shell is suspended - we are exactly at step 4. Go to remote shell, and type the following:

(foo@bar)1> process_info(whereis(shell)).
 ...
 {current_function,{erl_eval,receive_clauses,6}},
 ...
 {message_queue_len,0},
 {messages,[]},
 ...

That's interesting: no messages in the mailbox. As Joe said, they are in the save queue. Now send a matching message:

(foo@bar)2> shell ! a.
a

Go back to initial shell, which should be resumed now, and check the mailbox again:

1
(foo@bar)5> process_info(whereis(shell)).
 ...
 {current_function,{erl_eval,do_apply,5}},
 ...
 {message_queue_len,2},
 {messages,[c,d]},
 ...

That's what we saw in the previous test, but now you know what happens behind the scenes: messages are moved from the mailbox to the save queue and then back to the mailbox after the matching message arrives.

Now you should understand better how selective receive works. Next time you explore your Erlang process, keep in mind the save queue and disappearing and reappearing messages.

Saturday, November 06, 2010

Book review: Erlang and OTP in Action

Title: Erlang and OTP in Action
Author: Martin Logan, Eric Merritt, and Richard Carlsson
Paperback: 432 pages
Publisher: Manning Publications; November 2010
Language: English
ISBN-10: 1933988789
ISBN-13: 978-1933988788
$38.99 (amazon.com)

Overview

Even though this book has Erlang in its title, it's only about 15% of the content dedicated to Erlang language itself — the biggest portion of the book is about OTP. Nowadays, when more and more developers get familiar with Erlang, they need a new book that can boost them to the next level of proficiency, where they can produce industry standard code leveraging all the power of Erlang platform. This book is supposed to fill this gap!

Part One — The OTP basics


Chapter 1 — The Erlang/OTP platform

This chapter gives an overview of the important concepts and features of Erlang/OTP: concurrency, fault-tolerance, distribution. It discusses four inter-process communication paradigms — shared memory, STM, futures, message passing — and shows how the latter makes the distribution trivial to implement in Erlang. You will see how the linked processes and supervision trees build the foundation of Erlang famous fault-tolerance, and how three aspects of Erlang runtime system — sophisticated scheduler, non-blocking IO, and per-process garbage collection — complete the picture.

Chapter 2 — Erlang language essentials

Take a deep breath — this long chapter is going to be an Erlang Crash Course. If you already worked with the language, most of it won't be new for you, but it's still worthy to read it because there are many small things that you are probably not aware of or don't use very often. For example,

• are you familiar with all available shell functions, and break menu options?
• do you know how to work with multiple shells in one window?
• how lists are implemented internally, and how to use ++ operator efficiently?
• what's the difference between arithmetic and exact equality operators?
• do you know that all operators are actually functions, and 1+2 is the same as erlang:'+'(1,2)?
• that assignment operator is a form of pattern matching?
• that you can use pattern matching instead of regex: "http://" ++ Rest = "http://www.erlang.org"?
• what's the difference between case- and if-expressions, and between pattern matching and guards?
• that besides list comprehensions there are also bitstring comprehensions: << <<X:3>> || X <- [1,2,3,4,5,6,7] >>?
• which steps Erlang preprocessor performs?
• what's the difference between linked and monitored processes?
• what's the relationship between messages and signals?

There is also nice introduction to algorithms in this chapter with excellent examples of how to use tail-recursion and accumulators to improve performance.

Some important topics are covered briefly, like selective receive mechanism, for example. But at the end of the chapter authors give a list of useful Erlang resources, including books and web sites, so you should be able to find there the answers to all your language related questions.

Chapter 3 — Writing a TCP based RPC service

This chapter is about OTP behaviours. It describes what behaviour is, what are the benefits of it comparing to pure Erlang implementation, and which parts the behaviour consists of. As a 'Hello, World' example authors implemented TCP server!

Over the course of the chapter you will learn how to model client-server communication using gen_server behaviour, and how to implement active socket connection using get_tcp module.

It also shows the industry conventions and best practices of how to implement and layout behaviour module. You can use this chapter as a reference every time you need to implement a behaviour.

Code snippet: TCP server.

Chapter 4 — OTP applications and supervision

An OTP application is what ties your modules into a single unit. A supervisor is what makes your application fault-tolerant. From this chapter you will learn how to implement both behaviours properly: how to layout application directory, how to structure application descriptor, how to write child specifications and restart strategies, and how to generate application documentation. As before, all examples are accompanied by standard conventions and best practices.

Sample code: application directory layout.

Chapter 5 — Using the main graphical introspection tools

This chapter demonstrates how to use some of the Erlang graphical tools: appmon, webtool, pman, debugger, and table viewer. It's good to know that those tools exist, so when you encounter a problem in your code, you would be able to find the root cause and resolve it quickly.


Part Two — Building a production system


In the second part of the book you are going to apply all the knowledge you obtained in the first part to build a real world production system: distributed cache.

Chapter 6 — Implementing a caching system

How do you implement a cache? I guess there are many ways to do it, but I would never come up with the idea the authors of the book came up with. They use a separate process to store each value, and they map each key to its corresponding process. How cool is that?! This way of thinking is possible only in Erlang.

During the implementation of process management you will learn a new strategy when the supervisor creates multiple child-processes in runtime based on preconfigured template. It's different from what you saw in Chapter 4 where single child process was created on the application startup. One interesting twist here is an inversion of control — the worker process will call the supervisor to start it.

The rest of the chapter is dedicated to ETS tables (which are used here to store the mapping). You will see how to create tables and how to perform CRUD operations.

Chapter 7 — Logging and event handling

Logging is very important part of any system. In OTP there are two logging utilities: error_logger and SASL. error_logger is similar to log4x libraries in other languages. It provides basic functions (info, warning and error) that you can call from your code to print messages to the standard output. SASL is more sophisticated. It's an OTP application that logs life cycle events, including crash reports, from other applications. Both methods are thoroughly described in the first part of this chapter.

The second part explains how to implement custom event handler. An OTP event handler is just another behaviour that models observer pattern. You can use it for example to implement your own log appender which you can plug in to the error_logger.

The final section of the chapter provides a step-by-step guide of how to build a custom event stream, and how to integrate it with the cache application. This technique was totally new to me. I never worked with event handlers on such advanced level.

Code snippets: event manager and event handler.

Chapter 8 — Distributed Erlang/OTP

Distribution is one of the famous features of Erlang. It's very easy to build distributed applications, and more important, it's such a fun to play with Erlang clusters.

This chapter will guide you through all the methods and techniques you need to know to make your application distributed. You will learn how to start Erlang nodes in different modes, how to combine them into the clusters, how to define topology and isolate clusters from each other, and how to send messages between nodes in the same cluster.

One of the cool things I learned from this chapter is a remote shell. It's very similar to SSH but more powerful. Unlike SSH, Erlang remote shell is not a session — it's a real shell of the remote node where you can start any application including graphical tools!

The second half of the chapter discusses the problem of resource discovery: What's the best way to add a new node to the cluster and synchronize its state with existing nodes? The authors come up with a simple and elegant algorithm. You will use this algorithm in the next chapter to build distributed cache.

Code snippet: resource discovery algorithm.

Chapter 9 — Adding distribution to the cache with Mnesia

When you design a distributed system you have to make a choice which inter-node communication strategy you are going to use: synchronous or asynchronous. Chapter 9 starts with the comparison of these two approaches, their advantages and drawbacks.

The next step towards the distributed cache is obvious: making the cache storage distributed. As you remember from the chapter 6 the storage was implemented as ETS table. The easiest way to make it distributed is to replace it with Mnesia database. Why and how? You will find it in the next section of this chapter.

You will learn what Mnesia is, how to configure it properly, and how to manipulate the data. At the end you will meet beauty and the beast of read operations - query list comprehensions and match specifications. Equipped with all these knowledge you will easily replace ETS table with Mnesia, and make your cache distributed.

The most amazing part of the last section is an algorithm of dynamic table replication. You will definitely appreciate it after you learn it — it's the heart of true scalability.

Code snippet: working with Mnesia.

Chapter 10 — Packaging, services, deployment

At this moment you should be able to write non-trivial OTP applications. It's time to think now how to make your application easy to install and start. So far you have started it manually from the shell, and if your app had many dependencies, it was a tedious process. This chapter describes how to automate it.

In OTP a deployment unit is called release. In this chapter you will learn how to build it properly, i.e. how to create release metadata and configuration, resolve dependencies, and generate boot scripts. You will see different ways to start your application: locally in shell, as a daemon or in embedded mode.

After you release the application, you might want to share it with other people. That's what the next section is about. It shows you how to make a package — standard or customized, universal or OS-dependent — and how to install it on a different machine.

Part Three — Integrating and refining


In the previous part you built a distributed cache in OTP, and you can use it now from any Erlang application. This is already a big achievement, and you must be proud of it, but you can make it even bigger if you expose this wonderful functionality to other platforms. Erlang is known for its robustness and scalability, and it would be very beneficial for non-Erlang clients as well to utilize these qualities.

Chapter 11 — Text and REST (Communication via TCP and HTTP)

The first non-Erlang interface you are going to implement is TCP. If you remember, you already did it in Chapter 3 when you implemented TCP server. That server though had one significant limitation: it handled only one connection. The new implementation in this chapter is more efficient: it supports multiple concurrent connections.

The next interface is HTTP. Although it sounds similar to the previous one, the way you will implement it is totally different. You won't use standard gen_server behaviour. Instead, you will implement a custom behaviour which you are going to define yourself. This is a very advanced topic, and if you want to build extensible systems in Erlang, you need to understand all the details of how to do it. Fortunately, this section provides thorough instructions.

Over the course of this chapter you will also learn bunch of other useful things besides server behaviours. You will see how HTTP protocol works and how to design RESTful services on top of it, how to use TCP sockets more effectively, and how to increase stability of your system with well-designed OTP supervisors. You will have lots of fun doing binary pattern matching.

Code snippets: TCP interface, HTTP server behaviour, REST interface.

Chapter 12 — Drivers (Communication with C programs)

This chapter is tough — you have to be a C programmer to understand all the details. If you are not involved into C programming, it's still worthy to read it, just to understand the concept, although it might be hard to get through the entire text.

There are two types of drivers in Erlang: port drivers and linked-in drivers. The chapter starts with an overview of them both. It explains their benefits and drawbacks, how you should design the driver, and where you should handle the driver's state, global vs. instance variables.

The rest of the chapter is a tutorial of how to implement drivers. It describes three components that comprise driver implementation: C side, Erlang side and the protocol between them. It shows the differences in each component for both types of drivers, and it gives you recommendations of how you should approach the problem required communication with C code.

Chapter 13 — Jinterface (Communication with Java programs)

Unlike the C driver implementation, connecting together Erlang and Java is pretty simple: you instantiate OtpNode class in the JVM thread, and it becomes available as Erlang node to any running Erlang application. You can start sending messages between Java and Erlang, and all Erlang terms will be properly converted to Java classes, and vice versa. All the magic is done in Jinterface library, which is a part of OTP distribution, and what you need to know to start using it is perfectly explained in this chapter.

After you learn how to work with Jinterface, you will apply this knowledge to building the bridge between the cache you implemented in the previous chapters and HBase. HBase is one of the modern NoSQL databases. If you didn't work with it before, don't worry — the authors will show you how to get started with it, and how to implement HBase connector using Java API. Having this API in place, all you need to do is to link it with the Erlang cache using the technique described above.

By the end of the chapter (and in fact end of the book) you will have a distributed cache written in Erlang backed by NoSQL database via Erlang-Java bridge. I don't know about you, but I was actually very impressed after I finished the coding and saw the entire solution working on my machine. It's really amazing that you can build pretty sophisticate piece of software with such a small amount of code.

Code snippets: message receiver and message responder.

Chapter 14 — Optimization and performance

As we all know, premature optimization is the root of all evil. In other words, don't spend time optimizing your solution before you actually measured the performance. That implies you must know what and how to measure. In this chapter authors describe the approach you should take when you prepare performance test, as well as the basic tools available in Erlang for performance testing: cprof and fprof.

The second part of the chapter explains the Erlang programming language caveats. You will see
• how primitive data types stored in memory, and which data structures you should use to fulfil performance requirements;
• how to use some built-in functions and operators properly;
• how to call function in different ways, and how performant those calls are;
• how compiler optimizes pattern matching and tail recursion;
• whether to use OTP behaviours or plain Erlang processes.

That concludes the main content of the book.

There are also two appendices in this book. The first one describes how to install Erlang on the OS of your choice. The second explains what referential transparency is and why lists in Erlang are implemented as they are.

Conclusion

If you are an intermediate Erlang developer, go and buy this book! It will teach you how to build robust production systems following proven design principles and standard conventions. It will make your code easy to read and maintain. You will learn lots of new things and it will be a big step towards Erlang mastery.

Happy OTPing!

Sunday, October 31, 2010

SpringOne2GX 2010

Last week I attended SpringOne2GX conference in Chicago, the main event in Spring/Groovy/Grails community. Here I want to post my brief review of this conference.

First impressions

The hotel (Westin Lombard) was nice and clean. Internet: there were 2 wireless networks and one cable - everything was free and worked pretty well, signal was good in almost all rooms. The conference reception was well organized - every participant received bunch of souvenirs and special edition of NFJS magazine. I saw hundreds of smiling and happy people of different ages and different outfits. Most of them with Macs. Most of them know each other. The food was fantastic, especially dinner with wine and beer.

Day 1


The first day was mostly introduction and orientation. There was only one talk on the schedule.

Rod Johnson - Keynote (video)

I thought Spring was initially created 7 years ago but the oldest class in the source tree is dated by January 17, 2001, so Spring is actually almost 10 years old. Because of the anniversary the main theme of the presentation was: Where Spring goes in the next decade.

Since the core framework is well crafted already, the focus will be on the integration and making Spring portfolio as a platform for applications. There are three key values in Spring - portability, productivity and innovation - and the platform will be built along those dimensions.

Portability

In the past SpringSource made a good job by providing a framework that make Java applications easily portable across different application servers. The goal for the next decade is to expand the same portability to the cloud - Google AppEngine, vFabric, vmforce, etc.

Productivity

As we all know the ultimate reason of the Spring existence is to make the life of application developer easier, our work is more productive. The framework hides the low-level boilerplate, and provides well defined abstractions. In the next year there will be several features added to the Spring portfolio. Rod mentioned some of them:
- Seamless GWT integration
- Database reverse engineering with roundtripping support in Spring Roo 1.1. You will be able to generate the domain object tree based on your database schema, and it will be updated every time you change the database.
- Spring Payment Services project with Visa integration.

Another aspect of productivity is a tool suite, and here Spring gives you STS. Rod invited Christian Dupuis on the stage, where he demoed how to developed Grails applications in STS. If you are a Grails developer you should definitely take a look at the latest version of STS - it will increase your productivity significantly.

Innovation

There will be several new projects released in the Spring portfolio soon:
- Spring Social - application abstraction for social networks.
- Spring Mobile - platform for multi-device applications.
- Spring-AMQP - API for integration with RabbitMQ.
- Spring Data - API to work with NoSQL databases, in particular Neo4J support in Spring Roo.

Keith Donald demoed GreenHouse project and corresponding iPhone app. This is a reference implementation of Spring Mobile and Spring Social, and this app was really really useful during the conference when I needed to check the schedule and find the room.

At the end of the presentation Rod introduced, and Mik Kersten demoed, the next big thing - Code2Cloud. It's basically a tool that allows you to keep and manage your entire development environment in the cloud: the running app, the source code, the issue tracker, and the build server. Everything is in the cloud and configured by mouse click. It looks cool, and it definitely will be a buzz word in the next year, but I'm not sure if many people will use it. We'll see.

Day 2


I'm going to write only about technical sessions I attended.

Jürgen Höller - What's new in Spring Framework 3.1? (video)

That was one of the best talks of this conference: technical, right to the point, with well-wrtten slides, and personal charm of the presenter. Despite the number 3.1 in the title, Jürgen actually covered three versions of Spring framework: 3.0, 3.1, and 3.2. I'm going to briefly mention the interesting features, and if you want more details you can check the excellent on-line documentation.

Spring 3.0

- Custom annotations. You can create your own annotation by combining multiple existing annotations in one group. Spring automatically detects your annotation during the application context startup, and no special configuration is required. This is a very handy feature, especially when you copy-paste the same annotation group over and over again.

- Configuration classes and annotated factory methods. If you annotate a method with @Bean annotation Spring framework will make the output of the method a Spring bean. There are some other annotations supported, e.g. @Lazy.

- Standardized annotations. Spring now supports JSR-330 @Inject, JSR-250 @ManagedBean, and EJB 3.x @TransactionAnnotation.

- EL++. Expression language can be used now in bean definitions inside appcontext XML, and also in component annotations. Very powerful feature.

- REST support. Spring provides RestTemplate for client code, @PathVariable annotation, and special view resolvers on the server side. It's very interesting topic - check the documentation for details.

- Declarative model validation. You can specify data constraints right in your code by using annotations - very similar to what you have in GORM.

- Improved scheduling. New namespace, and @Scheduled and @Async annotations makes your appcontext smaller and more readable.

If you follow Spring releases, you probably use some or most of these features already. Now let's see what Spring 3.1 brings to us.

Spring 3.1

- Environment profiles for beans. Similar to Maven profiles but works in runtime. The idea here is to create a single deployment unit for all environments and enable certain Spring beans for specific environment. I can't wait to try this feature in our enterprise project.

- Cache abstraction. After 5 years of hibernation this feature is finally implemented. Spring provides an API to work with distributed cache, in particular in cloud environments. There will be adapters for most popular cache implementations, such as EhCache, GemFire, Coherence.

- Conversation management, or how Jürgen calls it HttpSession++. It's basically an extension of HttpSession shared across multiple browsers and window tabs. Looks very interesting.

- Enhanced Groovy support.

- c: namespace, which is a shortcut for <constructor-arg>, analogous to p: namespace for properties. Small feature that makes your appcontext consistent and more readable.

Spring 3.2

Java SE 7 support, JDBC 4.1, support for fork-join framework, general focus on concurrent programming.

Jeff Brown - GORM inside and out

This talk was also good. I worked a bit with GORM before, and had an idea how it's implemented, but it was useful to hear more details from one of the developers.

Jeff started with the background of GORM, the complexity of Hibernate and JPA, and how GORM solves this problem following convention-over-configuration and sensible defaults strategy. He showed how to model the domain objects, what happens behind the scene when you link objects together, how to specify uni- and bi-directional relationships, and how to change default collection implementation in case of one-to-many relationship.

During the presentation he was switching back and forth between sides and terminal, so it was easy to follow and understand the evolution of the sample application. He explained how to introduce various constraints into the model and how Grails would validate them. One of the interesting features I didn't know about was how to test internationalized error messages. You don't need to change your locale for that, simply add lang=your_language parameter to the URL, and Grails will switch to that language for all subsequent requests. Pretty handy.

He concluded the talk by showing how dynamic finders are implemented in GORM using Groovy metaprogramming feature. Interesting part here is that you can implement similar things in your Groovy code using the same technique, basically having custom mini-GORM in your Groovy project.

Venkat Subramaniam - Improving your Groovy code quality

The title of this presentation was little bit misleading for me. I expected Venkat to show some Groovy specific mistakes and how to avoid them. Instead, he was talking about the errors that in most cases are equally applied to any programming language. He mentioned various code smells and explained how to fix them. If you are interested, you can download the slides from Venkat's web site.

He also gave an advise how to maintain the high code quality:
- Have a respectable colleague review your code.
- Use code analysis tools like CodeNarc and Sonar Groovy plugin.

One of the topics he covered was the usage of the 'return' keyword in Groovy. That was interesting. Compare the following two functions and guess what they return:

def func1() {
try {
5
} finally {
return 22
}
}

def func2() {
try {
5
} finally {
22
}
}

Paul King, Guillaume Laforge - Groovy.DSLs (from: beginner, to: expert) (video)

This would be very nice presentation if the speakers didn't try to cover too much. This talk could be easily split into two: one is an overview of Groovy language and another one is DSL. Unfortunately they spent lot of time on theoretical DSL part and Groovy overview, so the practical DSL part was too short from my perspective. The good thing though is that I have slides now, so I can dig deeper into this subject at my spare time.

In the second part of the talk Paul and Guillaume explained which features of Groovy language make it so simple to create DSLs. Here are some of them:
- Static imports and import aliases.
- Simplified collection syntax.
- Small or no language noise.
- Aggregating multiple method calls using 'with' construct.
- Closures.
- Operator overloading.
- Metaprogramming.

In the last part speakers talked about different patterns and techniques of DSL implementations. They provided a comprehensive list of books you might want to read if you are interested in building DSLs.

Adrian Colyer - Technical keynote (video)

Adrian's talk was mostly a reiteration of Rod's keynote from the previous day with some technical details. He mentioned Spring Payment and Spring Data projects, bean profiles and cache support in the Spring core. He showed Spring portability in action by providing links to Spring applications deployed on Google AppEngine and vmForce.

Another interesting part was 20 minutes dedicated to RabbitMQ and Spring-AMQP. He even mentioned Spring-Erlang project which is supposed to be a convenient abstraction on top of standard Jinterface library.

As a continuation of innovation theme Graeme Rocher demoed GORM support for NoSQL databases. That was cool. He simply uninstalled Hibernate plugin and installed Redis plugin, without touching data model. Everything worked perfect. Right now Spring works with Redis and GemFire, but soon they are going to add support for CouchDB, Cassandra, Riak, Neo4j, and MongoDB. Another interesting thing Graeme showed was grails-console. It's a pretty nice tool, you should check it out. It allows you to interact with the Grails data storage using GORM features. Very handy.

Another co-presenter was Keith Donald who demoed Spring Social and Spring Mobile. He explained how OAuth works, and how interoperability with social networks was implemented in GreenHouse.

The keynote was concluded by Jon Travis who demoed SpringInsight.

Day 3


Venkat Subramaniam - Functional programming in Groovy

That was an excellent talk and nice start of the new conference day. Venkat explained main concepts and values of functional programming, and illustrated the theory with comprehensible examples.

He compared imperative and functional style of programming by showing how to implement for-loop using inject() function in Groovy. I think it was one of the best explanations of functional folding I've ever heard. He also demonstrated map and filter operations using collect() and findAll() methods.

He clarified the difference between function value and closure, and between iterative procedure and iterative process. He gave an example on how to pass closure as a parameter to simulate function object in Groovy. He also showed how to replace tail-recursion, which Groovy doesn't support, with inject() method call.

The presentation was concluded with an example of how to use functional techniques to build DSLs in Groovy.

Matthias Radestock, Mark Pollack, Mark Fisher - RabbitMQ and Spring-AMQP (video)

If you read my blog, you know that RabbitMQ is one of my latest interests. I decided to go to this talk just to see how the creators would present their projects. It turned out to be a nice introduction to RabbitMQ and Spring-AMQP. They explained main concepts of AMQP and how it is different from JMS. Here I want to give you some ideas which were not obvious for me when I started working with RabbitMQ.

- Messaging is all about decoupling, and AMQP is much more flexible than JMS in terms of publisher-consumer decomposition.
- All resources are dynamically created and destroyed by clients - the static pre-configuration is optional.
- Exchanges are stateless, they don't keep messages, they only copy and dispatch them. Queues hold the messages and deliver one message to a single client. They neither do routing nor message copying.
- Queue never receives the same message twice.
- If the message doesn't match routing key it's dropped.
- Because of the open protocol, you can use all available TCP tools to monitor your message traffic.

Besides AMQP implementation RabbitMQ also provides some other useful features like custom exchanges, exchange-to-exchange routing, different protocol adaptors, etc. Spring, as usual, gives you a consistent API on top of the RabbitMQ client which hides all low-level boilerplate and makes your application code more readable.

Good presentation, great guys.

Craig Walls - Developing social-ready web applications (video)

This presentation was about integrating your Java code with different social networks. There are three types of such integration: widgets, embedded code, REST API. Craig briefly explained first two, and then dived into REST.

All popular social networks provide REST API which allows you to communicate with them. For simple operations, like search, you can just use standard Spring RestTemplate class to retrieve the data. Try for example the following URLs:
- http://api.twitter.com/1/friends/ids.xml?screen_name=ndpar
- http://search.twitter.com/search.json?q=s2gx
- https://graph.facebook.com/ndpar

This basic approach fails though if you try to post a new message, because you have to be authorized for update operations. That's where OAuth comes in. The idea behind OAuth is pretty simple: instead of sharing your user-password with different clients, it uses generated tokens. This model is more flexible because if you want to revoke the permission from particular client you don't need to change your password and notify rest of the clients - you just remove that client's token from the list of authorized clients and that's it. The only problem with OAuth and social networks is that they support different versions of OAuth. This problem is solved by Spring Social project.

Spring Social offers consistent template-based API across different social providers. It basically gives you an OAuth aware RestTemplate, so you can do something like this:

TwitterTemplate twitter = new TwitterTemplate(API_KEY, API_SECRET, ACCESS_TOKEN, ACCESS_TOKEN_SECRET);
twitter.updateStatus("Hello #s2gx !");
twitter.retweet(26887414177L);

If you are in a social network business, definitely take a look at Spring Social.

Mark Pollack, Chris Richardson - Using Spring with non-relational databases (video)

Relational databases are great, right? They've been with us for ages. Everybody knows how to work with them, how to build SQL statements. Every language provides ODBC library. There are bunch of frameworks that make developer's life easier. So why so sudden buzz around NoSQL?

Mark and Chris started their talk highlighting some problems that exist in relational database world:
- Object-relational impedance mismatch. Complicated mapping of rich domain model to relational schema. Relational schema rigidity.
- Extremely difficult/impossible to scale write operations.
- Suboptimal performance in some cases.

All these issues are addressed in NoSQL databases. Although keep in mind that it's not coming for free - you have to trade off ACID semantics, transactions and some other features of RDBMS. But if scalability is more important for you than consistency then NoSQL is your way to go.

There are tons of NoSQL databases available for you, but they all can be split into 4 categories based on their data model:
- Key-Value: Amazon Dynamo, Redis, Riak, Voldemort.
- Column: Google Bigtable, HBase, Cassandra.
- Document: CouchDB, MongoDB.
- Graph: Neo4j, Sones, InfiniteGraph.

Mark and Chris talked about each type, what their typical use cases are, and how their APIs look like. They showed examples for Redis, Cassandra, MongoDB, CouchDB and Neo4j. Then they introduced Spring Data project which, as everything from SpringSource, simplifies the application development and eliminates low-level code. Right now they support most of the popular NoSQL databases, and they plan to add more in the future.

The project is in active development phase, and the new contributors are welcome. So if it sounds interesting for you, go and check it out.

Day 4


Hans Dockter - Gradle - a better way to build

I never played with Gradle, so I was very curious to see how it looks like. According to Hans, who is the creator of this tool, Gradle is a general purpose build system with Groovy DSL interface. It's written in Java and provides build-in support for Java, Groovy, Scala, web and OSGi projects. It's a build language, so you can extend it for your own purposes if needed.

If you compare it with Ant, Gradle is definitely much better because it's more compact and flexible. It offers dependency resolution with integration with Maven and Ivy repositories. It also has some advanced features like incremental builds for custom tasks and parallel testing.

The only problem I had with this presentation was that Hans kept comparing Gradle with Maven. In my opinion they are not comparable. They have different philosophy if you want. All Maven 'constraints' are imposed by design, so it makes no sense to blame Maven for them. I think Ant-Gradle comparison is more appropriate and that's what Hans should have emphasized.

Other than that the session was pretty informative, and I have a better picture of Gradle now.

Brian Sletten - Groovy + The Semantic Web

I had no idea what Semantic Web was. I saw this term first time on the conference schedule, so I decided to go to this talk just to educate myself. I cannot even briefly describe all the discoveries I made during this presentation because I still feel little bit overwhelmed. I just want to provide some links from Brian's slides that can guide you if you want to learn this concept.

- Semantic Web - article from wikipedia.
- Formal W3C specs: RDF, RDFa, SKOS, SPARQL, OWL.
- SPARQL demo.
- RDFa distiller and parser. Try to feed Brian's test page URL (http://bosatsu.net/nfjs/test.html) to the distiller and see what it returns.
- OG - open graph protocol.
- Jena - Java API to work with Semantic Web.
- Java-RDFa parser.
- Pellet - Java API for OWL.

Conclusion

Whew! This happens to be longer review than I planned initially. If you are still with me you deserve my applause!

There were much more presentations at this conference but because of the tight schedule I had to sacrifice 80% of them. My overall impression from this conference is very positive. If you are a Spring/Groovy/Grails developer I encourage you to go to this event next year. The biggest benefit of it: You start seeing the Spring as a universe, not as a bunch of separate projects. You cannot get this feeling from the documentation, even if it's perfect as the Spring one.

Monday, August 02, 2010

Working with RabbitMQ in Spring applications

Recently SpringSource released Spring AMQP 1.0.0.M1. Now, if you are a Spring shop working with RabbitMQ, you don't need to write low level code to connect to RabbitMQ server anymore. Instead, you can use well-known Spring abstractions (message templates and containers) to produce/consume AMQP messages, the same approach you would use for JMS. Here is my previous example re-implemented using Spring AMQP.

Very simple application classes (sender and receiver)

import org.springframework.amqp.core.AmqpTemplate;
import org.springframework.beans.factory.annotation.Autowired;

public class MessageSender {

@Autowired
private AmqpTemplate template;

public void send(String text) {
template.convertAndSend(text);
}
}

import org.springframework.amqp.core.Message;
import org.springframework.amqp.core.MessageListener;

public class MessageHandler implements MessageListener {

@Override
public void onMessage(Message message) {
System.out.println("Received message: " + message);
}
}

and pretty standard application context

<context:annotation-config />

<bean id="rabbitConnectionFactory" class="org.springframework.amqp.rabbit.connection.SingleConnectionFactory"
p:username="guest" p:password="guest" p:virtualHost="/" p:port="5672">
<constructor-arg value="lab.ndpar.com" />
</bean>

<bean id="rabbitTemplate" class="org.springframework.amqp.rabbit.core.RabbitTemplate"
p:connectionFactory-ref="rabbitConnectionFactory"
p:routingKey="myRoutingKey"
p:exchange="myExchange" />

<bean id="messageSender" class="com.ndpar.spring.rabbitmq.MessageSender" />


<bean class="org.springframework.amqp.rabbit.listener.SimpleMessageListenerContainer"
p:connectionFactory-ref="rabbitConnectionFactory"
p:queueName="myQueue"
p:messageListener-ref="messageListener" />

<bean id="messageListener" class="com.ndpar.spring.rabbitmq.MessageHandler" />

That's it, simple and clean.

Resources

• Spring AMQP official page

• Source code for this blog

Wednesday, March 31, 2010

Integrating RabbitMQ with ejabberd

Last few days I've been trying to make RabbitMQ and ejabberd work smoothly together by means of mod_rabbitmq gateway. The official mod_rabbitmq document is pretty clear but the installation chapter is rather short. Plus, it presumes that ejabberd is installed from the source tree, which might not be the case. Here I want to give you more detailed instructions on the installation/configuration process in case mod_rabbitmq doesn't work for you out of the box.

My environment is Ubuntu 9.10 with rabbitmq-server and ejabberd packages installed via apt-get. Both RabbitMQ and ejabberd are up and running. Now I want them to talk to each other and route messages properly.

Compiling mod_rabbitmq


If you have the same environment as mine you can just download the binary and the header files, and copy them to the corresponging ejabberd folders (see last two lines in the bash snippet below). Alternatively you can compile mod_rabbitmq.beam file yourself:

$ git clone git://git.process-one.net/ejabberd/mainline.git ejabberd
$ cd ejabberd
$ git checkout -b 2.1.x origin/2.1.x
$ cd src
$ wget http://hg.rabbitmq.com/rabbitmq-xmpp/raw-file/73c129561101/src/mod_rabbitmq.erl
$ wget http://hg.rabbitmq.com/rabbitmq-xmpp/raw-file/73c129561101/src/rabbit.hrl
$ ./configure --disable-tls
$ make
$ sudo cp mod_rabbitmq.beam /usr/lib/ejabberd/ebin/
$ sudo cp rabbit.hrl /usr/lib/ejabberd/include/

Configuring mod_rabbitmq


You need to know the short name of the machine you are running RabbitMQ on. Use hostname -s command for this. Open /etc/ejabberd/ejabberd.cfg file for edit, find modules section, and add mod_rabbitmq stanza to the list

{modules,
[
{mod_adhoc, []},
...
{mod_rabbitmq, [{rabbitmq_node, rabbit@yourhostname}]},
...
{mod_version, []}
]}.

Replace yourhostname with your machine short name. In my case it was ubuntu.

Setting up cookie


To make RabbitMQ and ejabberd work together, they have to run in the same Erlang cluster. That means they have to use the same cookie file. By default RabbitMQ is installed under rabbitmq user with /var/lib/rabbitmq home directory, and ejabberd under ejabberd user with /var/lib/ejabberd home directory. If you compare their cookies

$ sudo cat /var/lib/rabbitmq/.erlang.cookie
$ sudo cat /var/lib/ejabberd/.erlang.cookie


they will most likely be different. That's why if you restarted ejabberd now you would see exception in RabbitMQ log: "Connection attempt from disallowed node ejabberd@ubuntu". To fix it just copy one cookie file to another

$ sudo /etc/init.d/ejabberd stop
$ sudo mv /var/lib/ejabberd/.erlang.cookie /var/lib/ejabberd/.erlang.cookie.orig
$ sudo cp /var/lib/rabbitmq/.erlang.cookie /var/lib/ejabberd/.erlang.cookie
$ sudo chown ejabberd:ejabberd /var/lib/ejabberd/.erlang.cookie
$ sudo /etc/init.d/ejabberd start

The installation part is now done, and you are good to go.

Adding rabbit buddy to your roster


The rabbit's JID comprises two parts: exchange name and routing domain. To find the latter one, look at the /var/log/ejabberd/ejabberd.log file. Searching for "Routing" you should get something like this

=INFO REPORT==== 2010-03-30 21:35:22 ===
{contacted_rabbitmq,rabbit@ubuntu}

=INFO REPORT==== 2010-03-30 21:35:22 ===
I(<0.314.0>:mod_rabbitmq:90) : Routing: "rabbitmq.jabber.ndpar.com"


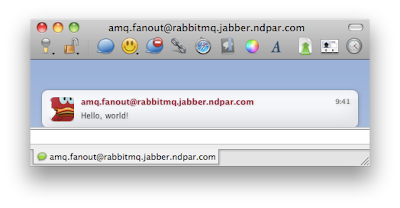
This is the buddy's domain. For the name you can use any exchange name available in the RabbitMQ server. Run sudo rabbitmqctl list_exchanges command and pick up the name from the list. I use amq.fanout exchange which exists in every RabbitMQ server. So I go to my IM client (Adium) and add this user to the buddies list

amq.fanout@rabbitmq.jabber.ndpar.com

Rabbit's greetings


To publish a message to RabbitMQ I use the same Groovy script as in the previous post. I just amended the exchange name and routing key

channel.basicPublish 'amq.fanout', '', null, 'Hello, world!'.bytes

Run the script and voilà, you've got mail


Troubleshooting


Here are some hints for you if something goes wrong.

• While working with mod_rabbitmq keep an eye on the log files of both RabbitMQ and ejabberd:

$ tail -f /var/log/ejabberd/ejabberd.log
$ tail -f /var/log/rabbitmq/rabbit.log

• Check which exchanges, queues and bindings the RabbitMQ server has:

$ sudo rabbitmqctl list_exchanges
$ sudo rabbitmqctl list_queues
$ sudo rabbitmqctl list_bindings

• If you screw up something there, you can roll back to the default values:

$ sudo rabbitmqctl stop_app
$ sudo rabbitmqctl reset
$ sudo rabbitmqctl start_app

• Check ejabberd web admin, it has lots of information there

http://yourdomainname:5280/admin

• If your IM client is Adium, check its folder periodically — it tends to collect some garbage there:

~/Library/Application Support/Adium 2.0/Users/Default/libpurple

Resources

• Tony Garnock-Jones' presentation slides about RabbitMQ and its extensions

Sunday, March 14, 2010

Get started with RabbitMQ

RabbitMQ is an open-source implementation of AMQP. If you don't know what AMQP is, I encourage you to check it out on the official web site, or alternatively read articles listed on the reference page. Here I want to mention only the reasons why it drew my attention as an Erlang enthusiast and Java developer working in financial industry:
  • AMQP is a replacement for TIBCO Randezvous;
  • in terms of functionality it's a superset of JMS;
  • it's written in Erlang, which means fault-tolerance, reliability and high performance.

In this blog post I just want to show how to install RabbitMQ on Ubuntu box, and verify that it works with simple Groovy client.

Installing RabbitMQ server


As everything with Ubuntu, this step is pretty trivial:

$ sudo apt-get install rabbitmq-server

The only requirement for this package is Erlang distribution. If you already have Erlang installed on your system, the installation of rabbitmq-server is a quick procedure. The following directories will be created during the installation:


/usr/lib/rabbitmq/binexecutables added to the path
/usr/lib/erlang/lib/rabbitmq_server-1.x.xcompiled modules
/var/lib/rabbitmq/mnesiapersistent storage for messages
/var/log/rabbitmqlog files (e.g. startup_log, rabbit.log)

After installation is finished the RabbitMQ server is started and listens to incoming requests on port 5672. You can check /var/log/rabbitmq/startup_log file to see if everything was ok.

Groovy clients


I followed official Java client API to build two scripts: consumer.groovy
import com.rabbitmq.client.*

@Grab(group='com.rabbitmq', module='amqp-client', version='1.7.2')
params = new ConnectionParameters(
username: 'guest',
password: 'guest',
virtualHost: '/',
requestedHeartbeat: 0
)
factory = new ConnectionFactory(params)
conn = factory.newConnection('lab.ndpar.com', 5672)
channel = conn.createChannel()

exchangeName = 'myExchange'; queueName = 'myQueue'

channel.exchangeDeclare exchangeName, 'direct'
channel.queueDeclare queueName
channel.queueBind queueName, exchangeName, 'myRoutingKey'

def consumer = new QueueingConsumer(channel)
channel.basicConsume queueName, false, consumer

while (true) {
delivery = consumer.nextDelivery()
println "Received message: ${new String(delivery.body)}"
channel.basicAck delivery.envelope.deliveryTag, false
}
channel.close()
conn.close()

and publisher.groovy
import com.rabbitmq.client.*

@Grab(group='com.rabbitmq', module='amqp-client', version='1.7.2')
params = new ConnectionParameters(
username: 'guest',
password: 'guest',
virtualHost: '/',
requestedHeartbeat: 0
)
factory = new ConnectionFactory(params)
conn = factory.newConnection('lab.ndpar.com', 5672)
channel = conn.createChannel()

channel.basicPublish 'myExchange', 'myRoutingKey', null, "Hello, world!".bytes

channel.close()
conn.close()

Now start consumer in one terminal window
$ groovy consumer.groovy

and run publisher in another:
$ groovy publisher.groovy

On the consumer window you should see Received message: Hello, world! text, which means RabbitMQ works correctly.

Monitoring logs


You can check RabbitMQ logs by doing tail -f /var/log/rabbitmq/rabbit.log For example, starting the consumer results the following log entries:
=INFO REPORT==== 14-Mar-2010::11:20:53 ===
accepted TCP connection on 0.0.0.0:5672 from 192.168.2.10:62424

=INFO REPORT==== 14-Mar-2010::11:20:53 ===
starting TCP connection <0.24154.1> from 192.168.2.10:62424

Running the publisher:
=INFO REPORT==== 14-Mar-2010::11:22:08 ===
accepted TCP connection on 0.0.0.0:5672 from 192.168.2.10:62432

=INFO REPORT==== 14-Mar-2010::11:22:08 ===
starting TCP connection <0.24232.1> from 192.168.2.10:62432

=INFO REPORT==== 14-Mar-2010::11:22:08 ===
closing TCP connection <0.24232.1> from 192.168.2.10:62432

Now if we terminate the consumer by ^C there will be a warning
=WARNING REPORT==== 14-Mar-2010::11:25:03 ===
exception on TCP connection <0.24154.1> from 192.168.2.10:62424
connection_closed_abruptly

=INFO REPORT==== 14-Mar-2010::11:25:03 ===
closing TCP connection <0.24154.1> from 192.168.2.10:62424

but the connection is closed properly by the server.

That's it for now. Stay tuned for the future updates on my RabbitMQ experience.

Links


• Rapid application prototyping with Groovy DSL

Tuesday, February 23, 2010

Installing ejabberd on Ubuntu

Recently I've installed ejabberd server on Ubuntu box. Thanks to this nice document, the process was pretty straightforward. My experience was little bit different from the author's one, so I want to show here exact steps I did to make it work, maybe it will be helpful for you too.

The first step is to install the required package. You can use Synaptic Package Manager or just command line:

sudo apt-get install ejabberd

During the installation a new user, ejabberd, will be created in the system. This is the user the server will be running on. When installation is finished ejabberd server is started. To configure the server you need to stop it

sudo /etc/init.d/ejabberd stop

Next step is to configure administrator and hosts. Open /etc/ejabberd/ejabberd.cfg file for edit and make the following change

%% Admin user
{acl, admin, {user, "andrey", "jabber.ndpar.com"}}.
%% Hostname
{hosts, ["localhost", "ubuntu", "jabber.ndpar.com"]}.

For admin you need to specify the user name and domain name that you want to use as a Jabber ID. By default it's localhost and it's functional but it's better to change it to something meaningful. The list of hostnames is tricky. In theory you can provide there just localhost but in practice it didn't work for me. After digging into some Erlang exceptions I got while registering admin account (see next step) I came to conclusion that in the list of hostnames there must be a short hostname of the box. You can get it by running hostname -s command (in my case it was "ubuntu"). In addition you can provide other hostnames you like, but the short one is mandatory.

When you are done with editing, start the server

sudo /etc/init.d/ejabberd start

Now it's time to register the admin user we configured on the previous step. Run the following command replacing password placeholders with the actual password and providing user name and domain name from ejabberd.cfg file

sudo ejabberdctl register andrey jabber.ndpar.com xxxxxx

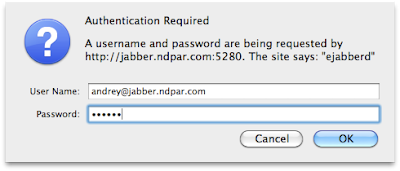
That's it! You have now working XMPP server with one registered user. To verify that everything is ok, in your browser go to the admin page of the server (http://jabber.ndpar.com:5280/admin) and check the statistics. You'll be asked to type your JID and password, so use the information you entered on the previous step


As a note, I didn't create my own SSL certificate because for isolated intranet the default one is quite enough. If you are not comfortable with that feel free to create a new certificate following the steps from the original article.

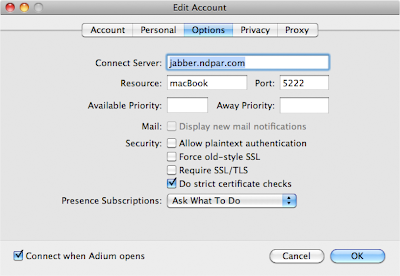
Now you are ready to add newly created account to your Jabber client. In Adium, for example, go to File -> Add Acount -> Jabber and provide server hostname/IP, JID and password.


Click OK button, accept security certificate permanently and go online.

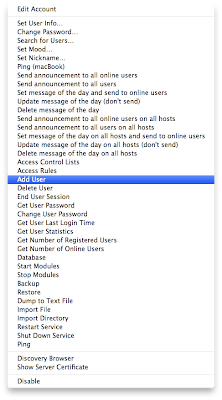
Now, to really enjoy IM you need more users on your server. The best part here is that you can create new users just from your Jabber client. You can actually do many things from the client, and you don't need to ssh to the remote server and run command for that. Just go to File -> your ejabberd account, and chose whatever you need from the menu


Pretty cool, eh — client and admin tool in one place.

Wednesday, February 10, 2010

Multithreaded XmlSlurper

Groovy XmlSlurper is a nice tool to parse XML documents, mostly because of the elegant GPath dot-notation. But how efficient is XmlSlurper when it comes to parsing of thousands of XMLs per second? Let's do some simple test

class XmlParserTest {

static int iterations = 1000

def xml = """
<root>
<node1 aName='aValue'>
<node1.1 aName='aValue'>1.1</node1.1>
<node1.2 aName='aValue'>1.2</node1.2>
<node1.3 aName='aValue'>1.3</node1.3>
</node1>
<node2 aName='aValue'>
<node2.1 aName='aValue'>2.1</node2.1>
<node2.2 aName='aValue'>2.2</node2.2>
<node2.3 aName='aValue'>2.3</node2.3>
</node2>
<nodeN aName='aValue'>
<nodeN.1 aName='aValue'>N.1</nodeN.1>
<nodeN.2 aName='aValue'>N.2</nodeN.2>
<nodeN.3 aName='aValue'>N.3</nodeN.3>
</nodeN>
</root>
"""

def parseSequential() {
iterations.times {
def root = new XmlSlurper().parseText(xml)
assert 'aValue' == root.node1.@aName.toString()
}
}

@Test void testSequentialXmlParsing() {
long start = System.currentTimeMillis()
parseSequential()
long stop = System.currentTimeMillis()
println "${iterations} XML documents parsed sequentially in ${stop-start} ms"
}
}

I ran this test on my 4-core machine and I got

1000 XML documents parsed sequentially in 984 ms

Not really good (0.984 ms per document) but we didn't expect much from single threaded application. Let's parallelize this process

class XmlParserTest {
...
static int threadCount = 5
...
@Test void testParallelXmlParsing() {
def threads = []
long start = System.currentTimeMillis()
threadCount.times {
threads << Thread.start { parseSequential() }
}
threads.each { it.join() }
long stop = System.currentTimeMillis()
println "${threadCount * iterations} XML documents parsed parallelly by ${threadCount} threads in ${stop - start} ms"
}
}

And the result is

5000 XML documents parsed parallelly by 5 threads in 1750 ms

This is definitely better (0.35 ms per document) but doesn't look like parallel processing — the test time shouldn't increase in true parallelism.

The problem here is the default constructor of XmlSlurper. It does too much: first, it initializes XML parser factory loading bunch of classes; second, it creates new XML parser, which is quite expensive operation. Now imaging this happens thousand times per second.

Luckily, XmlSlurper has another constructor, with XML parser parameter, so we can create the parser up-front and pass it to the slurper. Unfortunately, we cannot reuse one parser instance between several slurpers because XML parser is not thread-safe — you have to finish parsing one document before you can use the same parser to parse another.

The solution here is to use preconfigured pool of parsers. Let's create one based on Apache commons-pool library.

public class XmlParserPoolableObjectFactory implements PoolableObjectFactory {
private SAXParserFactory parserFactory;

public XmlParserPoolableObjectFactory() {
parserFactory = SAXParserFactory.newInstance();
}
public Object makeObject() throws Exception {
return parserFactory.newSAXParser();
}
public boolean validateObject(Object obj) {
return true;
}
// Other methods left empty
}

public class XmlParserPool {
private final GenericObjectPool pool;

public XmlParserPool(int maxActive) {
pool = new GenericObjectPool(new XmlParserPoolableObjectFactory(), maxActive,
GenericObjectPool.WHEN_EXHAUSTED_BLOCK, 0);
}
public Object borrowObject() throws Exception {
return pool.borrowObject();
}
public void returnObject(Object obj) throws Exception {
pool.returnObject(obj);
}
}

Now we can change our test

class XmlParserTest {
static XmlParserPool parserPool = new XmlParserPool(1000)
...
def parseSequential() {
iterations.times {
def parser = parserPool.borrowObject()
def root = new XmlSlurper(parser).parseText(xml)
parserPool.returnObject(parser)
assert 'aValue' == root.node1.@aName.toString()
}
}
}

and run it again

1000 XML documents parsed sequentially in 203 ms
5000 XML documents parsed parallelly by 5 threads in 172 ms

That's much better (0.034 ms per document), and most importantly multi-threading really works now.

Resources

• Source code for this blog

• Article "Improve performance in your XML applications"

• GPath vs XPath

• commons-pool home page

Saturday, January 23, 2010

Distributed cache in Erlang

Implementing distributed cache in Erlang is relatively simple task because concurrency, distribution and failover mechanisms are built in the language. In fact, it's so simple that this task is a part of Erlang tutorial. Here I want to show the complete solution which is only 100 lines of code.

I'm going to implement the cache as a typical Erlang server application, that means set of three modules: server, supervisor and application. As underlined storage I'm using Mnesia database which is a part of standard Erlang distribution. It doesn't probably give you the best performance, but it does provide automatic replication. The cache is deployed on three nodes, each node on a separate machine.


Clients will connect to in-memory slave nodes, the master node is dedicated to persistence.

Configure Erlang cluster


Create file .erlang.cookie containing one line with random text. Copy this file to every machine in a cluster to home directory of the user who will start Erlang VM. Make sure this file has unix permissions 600.

Check /etc/hosts on every box to verify that every machine knows others by name.

Set up Mnesia database


Open terminals on all machines and enter Erlang prompt
ubuntu$ erl -sname master
Erlang R13B01 (erts-5.7.2) [source] [rq:1] [async-threads:0] [kernel-poll:false]
Eshell V5.7.2 (abort with ^G)

macBook$ erl -sname slave1
Erlang R13B02 (erts-5.7.3) [source] [smp:2:2] [rq:2] [async-threads:0] [kernel-poll:false]
Eshell V5.7.3 (abort with ^G)

iMac$ erl -sname slave2
Erlang R13B03 (erts-5.7.4) [source] [smp:2:2] [rq:2] [async-threads:0] [kernel-poll:false]
Eshell V5.7.4 (abort with ^G)

From one machine ping other two
(slave1@macBook)1> net_adm:ping(master@ubuntu).
pong
(slave1@macBook)2> net_adm:ping(slave2@iMac).
pong

Create database configuration
(slave1@macBook)3> mnesia:create_schema([slave1@macBook, slave2@iMac, master@ubuntu]).
ok

Start database on all nodes
(master@ubuntu)1> application:start(mnesia).
ok
(slave1@macBook)4> application:start(mnesia).
ok
(slave2@iMac)1> application:start(mnesia).
ok

Create cache table
(slave1@macBook)5> rd(mycache, {key, value}).
mycache
(slave1@macBook)6> mnesia:create_table(mycache, [{attributes, record_info(fields, mycache)},
{disc_only_copies, [master@ubuntu]}, {ram_copies, [slave1@macBook, slave2@iMac]}]).

{atomic,ok}

Stop database and quit Erlang VM
(slave1@macBook)7> application:stop(mnesia).
ok
(slave2@iMac)2> application:stop(mnesia).
ok
(master@ubuntu)2> application:stop(mnesia).
ok

Implement Erlang application


The main module of this application is mycache.erl
-module(mycache).
-export([start/0, stop/0]).
-export([put/2, get/1, remove/1]).
-export([init/1, terminate/2, handle_call/3, handle_cast/2]).
-behaviour(gen_server).
-include("mycache.hrl").

% Start/stop functions

start() ->
gen_server:start_link({local, ?MODULE}, ?MODULE, [], []).

stop() ->
gen_server:cast(?MODULE, stop).

% Functional interface

put(Key, Value) ->
gen_server:call(?MODULE, {put, Key, Value}).

get(Key) ->
gen_server:call(?MODULE, {get, Key}).

remove(Key) ->
gen_server:call(?MODULE, {remove, Key}).

% Callback functions

init(_) ->
application:start(mnesia),
mnesia:wait_for_tables([mycache], infinity),
{ok, []}.

terminate(_Reason, _State) ->
application:stop(mnesia).

handle_cast(stop, State) ->
{stop, normal, State}.

handle_call({put, Key, Value}, _From, State) ->
Rec = #mycache{key = Key, value = Value},
F = fun() ->
case mnesia:read(mycache, Key) of
[] ->
mnesia:write(Rec),
null;
[#mycache{value = OldValue}] ->
mnesia:write(Rec),
OldValue
end
end,
{atomic, Result} = mnesia:transaction(F),
{reply, Result, State};

handle_call({get, Key}, _From, State) ->
case mnesia:dirty_read({mycache, Key}) of
[#mycache{value = Value}] -> {reply, Value, []};
_ -> {reply, null, State}
end;

handle_call({remove, Key}, _From, State) ->
F = fun() ->
case mnesia:read(mycache, Key) of
[] -> null;
[#mycache{value = Value}] ->
mnesia:delete({mycache, Key}),
Value
end
end,
{atomic, Result} = mnesia:transaction(F),
{reply, Result, State}.

It implements Erlang generic server behaviour and provides three client functions – put, get, remove – with the same signature as similar methods in java.util.Map interface.

Next file is a supervisor for the cache, mycache_sup.erl
-module(mycache_sup).
-export([start/0]).
-export([init/1]).
-behaviour(supervisor).

start() ->
supervisor:start_link({local, ?MODULE}, ?MODULE, []).

init(_) ->
MycacheWorker = {mycache, {mycache, start, []}, permanent, 30000, worker, [mycache, mnesia]},
{ok, {{one_for_all, 5, 3600}, [MycacheWorker]}}.

It's going to monitor the main cache process and restart it in case of crash.

Next file, mycache_app.erl, provides methods to start and stop our cache gracefully within Erlang VM
-module(mycache_app).
-export([start/2, stop/1]).
-behaviour(application).

start(_Type, _StartArgs) ->
mycache_sup:start().

stop(_State) ->
ok.

Create application descriptor, mycache.app
{application, mycache,
[{description, "Distributed cache"},
{vsn, "1.0"},
{modules, [mycache, mycache_sup, mycache_app]},
{registered, [mycache, mycache_sup]},
{applications, [kernel, stdlib]},
{env, []},
{mod, {mycache_app, []}}]}.

The last module is optional, it provides a quick way to load our application on VM startup
-module(mycache_boot).
-export([start/0]).

start() ->
application:start(mycache).

That's it. Compile all these modules and copy binaries to all machines in the cluster. Place the binaries in the same folder you created Mnesia configuration.

Run Erlang application


Start Erlang VMs and load the application
ubuntu$ erl -sname master -s mycache_boot
Erlang R13B01 (erts-5.7.2) [source] [rq:1] [async-threads:0] [kernel-poll:false]

macBook$ erl -sname slave1 -s mycache_boot
Erlang R13B02 (erts-5.7.3) [source] [smp:2:2] [rq:2] [async-threads:0] [kernel-poll:false]

iMac$ erl -sname slave2 -s mycache_boot
Erlang R13B03 (erts-5.7.4) [source] [smp:2:2] [rq:2] [async-threads:0] [kernel-poll:false]

The cache is ready. You can start using it
(slave1@macBook)1> mycache:put("mykey", "myvalue").
null
(slave2@iMac)1> mycache:get("mykey").
"myvalue"
(master@ubuntu)1> mycache:put("mykey", "newvalue").
"myvalue"
(slave1@macBook)2> mycache:remove("mykey").
"newvalue"
(master@ubuntu)2> mycache:get("mykey").
null

It works! So, what do we actually achieve here with about 100 lines of Erlang code and bit of scripting?

• Distribution I run the app on three physical boxes, and it's transparent for the clients.
• Scaleability To add a new node to the cluster is just a matter of Mnesia re-configuration and copying of binary files to the new box.
• Concurrency Write and remove operations are transactional, and because of concurrent nature of Erlang itself our data is consistent and can be accessed by thousands of client processes.
• Fault tolerance Try to kill mycache process inside Erlang VM; it will be restarted automatically by supervisor and data will be replicated from other nodes to the new process.
• Persistence is optional and provided by Mnesia module.

All these benefits are given for free by Erlang/OTP, and it's not the end.

Call Erlang cache from Java


There are several ways of integrating Erlang applications with other languages. For Java the most convenient one is JInterface library. Here is the implementation of java.util.Map interface that communicates with the cache application we've just developed
import com.ericsson.otp.erlang.*;

public class ErlStringMap implements Map<String, String> {

private final OtpSelf self;
private final OtpPeer other;
private final String cacheModule;

public ErlStringMap(String client, String cookie, String serverNode, String cacheModule) {
try {
self = new OtpSelf(client, cookie);
other = new OtpPeer(serverNode);
this.cacheModule = cacheModule;
} catch (Exception e) {
throw new RuntimeException(e.getMessage(), e);
}
}

public String put(String key, String value) {
return remoteCall("put", key, value);
}

public String get(Object key) {
return remoteCall("get", (String) key);
}

public String remove(Object key) {
return remoteCall("remove", (String) key);
}

private String remoteCall(String method, String... args) {
try {
OtpConnection connection = self.connect(other);
connection.sendRPC(cacheModule, method, stringsToErlangStrings(args));
OtpErlangObject received = connection.receiveRPC();
connection.close();
return parse(received);
} catch (Exception e) {
throw new RuntimeException(e.getMessage(), e);
}
}

private OtpErlangObject[] stringsToErlangStrings(String[] strings) {
OtpErlangObject[] result = new OtpErlangObject[strings.length];
for (int i = 0; i < strings.length; i++) result[i] = new OtpErlangString(strings[i]);
return result;
}

private String parse(OtpErlangObject otpObj) {
if (otpObj instanceof OtpErlangAtom) {
OtpErlangAtom atom = (OtpErlangAtom) otpObj;
if (atom.atomValue().equals("null")) return null;
else throw new IllegalArgumentException("Only atom null is supported");

} else if (otpObj instanceof OtpErlangString) {
OtpErlangString str = (OtpErlangString) otpObj;
return str.stringValue();
}
throw new IllegalArgumentException("Unexpected type " + otpObj.getClass().getName());
}

// Other methods are omitted
}

Now from the Java application we can use our distributed cache same way we are using HashMap
String cookie = FileUtils.readFileToString(new File("/Users/andrey/.erlang.cookie"));
Map<String, String> map = new ErlStringMap("client1", cookie, "slave1@macBook", "mycache");
map.put("foo", "bar")

Performance?


Let's deploy Erlang and Java nodes following this topology


Here is the speed of the cache operations I get in the Java client:

write 30.385 ms
read 1.23 ms
delete 21.665 ms

If we remove network, i.e. move all VMs, Java and Erlang, to the same box, we'll get the following performance:

write 2.091 ms
read 1.35 ms
delete 2.057 ms

And if we also disable persistence, the numbers will be

write 1.75 ms
read 1.38 ms
delete 1.75 ms

As you can see, performance is not the best, but keep in mind that the purpose of this post is not to build production ready cache application, but show the power of Erlang/OTP in building distributed fault-tolerant systems. As an exercise, try to implement the same functionality using JDK only.

Resources

• Source code used in the blog.

• Upcoming book where authors seem to implement similar application.