Wednesday, March 31, 2010

Integrating RabbitMQ with ejabberd

Last few days I've been trying to make RabbitMQ and ejabberd work smoothly together by means of mod_rabbitmq gateway. The official mod_rabbitmq document is pretty clear but the installation chapter is rather short. Plus, it presumes that ejabberd is installed from the source tree, which might not be the case. Here I want to give you more detailed instructions on the installation/configuration process in case mod_rabbitmq doesn't work for you out of the box.

My environment is Ubuntu 9.10 with rabbitmq-server and ejabberd packages installed via apt-get. Both RabbitMQ and ejabberd are up and running. Now I want them to talk to each other and route messages properly.

Compiling mod_rabbitmq


If you have the same environment as mine you can just download the binary and the header files, and copy them to the corresponging ejabberd folders (see last two lines in the bash snippet below). Alternatively you can compile mod_rabbitmq.beam file yourself:

$ git clone git://git.process-one.net/ejabberd/mainline.git ejabberd
$ cd ejabberd
$ git checkout -b 2.1.x origin/2.1.x
$ cd src
$ wget http://hg.rabbitmq.com/rabbitmq-xmpp/raw-file/73c129561101/src/mod_rabbitmq.erl
$ wget http://hg.rabbitmq.com/rabbitmq-xmpp/raw-file/73c129561101/src/rabbit.hrl
$ ./configure --disable-tls
$ make
$ sudo cp mod_rabbitmq.beam /usr/lib/ejabberd/ebin/
$ sudo cp rabbit.hrl /usr/lib/ejabberd/include/

Configuring mod_rabbitmq


You need to know the short name of the machine you are running RabbitMQ on. Use hostname -s command for this. Open /etc/ejabberd/ejabberd.cfg file for edit, find modules section, and add mod_rabbitmq stanza to the list

{modules,
[
{mod_adhoc, []},
...
{mod_rabbitmq, [{rabbitmq_node, rabbit@yourhostname}]},
...
{mod_version, []}
]}.

Replace yourhostname with your machine short name. In my case it was ubuntu.

Setting up cookie


To make RabbitMQ and ejabberd work together, they have to run in the same Erlang cluster. That means they have to use the same cookie file. By default RabbitMQ is installed under rabbitmq user with /var/lib/rabbitmq home directory, and ejabberd under ejabberd user with /var/lib/ejabberd home directory. If you compare their cookies

$ sudo cat /var/lib/rabbitmq/.erlang.cookie
$ sudo cat /var/lib/ejabberd/.erlang.cookie


they will most likely be different. That's why if you restarted ejabberd now you would see exception in RabbitMQ log: "Connection attempt from disallowed node ejabberd@ubuntu". To fix it just copy one cookie file to another

$ sudo /etc/init.d/ejabberd stop
$ sudo mv /var/lib/ejabberd/.erlang.cookie /var/lib/ejabberd/.erlang.cookie.orig
$ sudo cp /var/lib/rabbitmq/.erlang.cookie /var/lib/ejabberd/.erlang.cookie
$ sudo chown ejabberd:ejabberd /var/lib/ejabberd/.erlang.cookie
$ sudo /etc/init.d/ejabberd start

The installation part is now done, and you are good to go.

Adding rabbit buddy to your roster


The rabbit's JID comprises two parts: exchange name and routing domain. To find the latter one, look at the /var/log/ejabberd/ejabberd.log file. Searching for "Routing" you should get something like this

=INFO REPORT==== 2010-03-30 21:35:22 ===
{contacted_rabbitmq,rabbit@ubuntu}

=INFO REPORT==== 2010-03-30 21:35:22 ===
I(<0.314.0>:mod_rabbitmq:90) : Routing: "rabbitmq.jabber.ndpar.com"


This is the buddy's domain. For the name you can use any exchange name available in the RabbitMQ server. Run sudo rabbitmqctl list_exchanges command and pick up the name from the list. I use amq.fanout exchange which exists in every RabbitMQ server. So I go to my IM client (Adium) and add this user to the buddies list

amq.fanout@rabbitmq.jabber.ndpar.com

Rabbit's greetings


To publish a message to RabbitMQ I use the same Groovy script as in the previous post. I just amended the exchange name and routing key

channel.basicPublish 'amq.fanout', '', null, 'Hello, world!'.bytes

Run the script and voilà, you've got mail
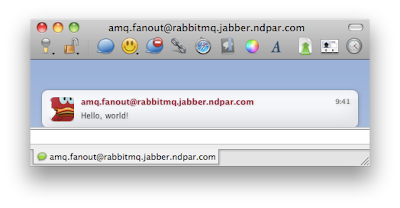


Troubleshooting


Here are some hints for you if something goes wrong.

• While working with mod_rabbitmq keep an eye on the log files of both RabbitMQ and ejabberd:

$ tail -f /var/log/ejabberd/ejabberd.log
$ tail -f /var/log/rabbitmq/rabbit.log

• Check which exchanges, queues and bindings the RabbitMQ server has:

$ sudo rabbitmqctl list_exchanges
$ sudo rabbitmqctl list_queues
$ sudo rabbitmqctl list_bindings

• If you screw up something there, you can roll back to the default values:

$ sudo rabbitmqctl stop_app
$ sudo rabbitmqctl reset
$ sudo rabbitmqctl start_app

• Check ejabberd web admin, it has lots of information there

http://yourdomainname:5280/admin

• If your IM client is Adium, check its folder periodically — it tends to collect some garbage there:

~/Library/Application Support/Adium 2.0/Users/Default/libpurple

Resources

• Tony Garnock-Jones' presentation slides about RabbitMQ and its extensions

Sunday, March 14, 2010

Get started with RabbitMQ

RabbitMQ is an open-source implementation of AMQP. If you don't know what AMQP is, I encourage you to check it out on the official web site, or alternatively read articles listed on the reference page. Here I want to mention only the reasons why it drew my attention as an Erlang enthusiast and Java developer working in financial industry:
  • AMQP is a replacement for TIBCO Randezvous;
  • in terms of functionality it's a superset of JMS;
  • it's written in Erlang, which means fault-tolerance, reliability and high performance.

In this blog post I just want to show how to install RabbitMQ on Ubuntu box, and verify that it works with simple Groovy client.

Installing RabbitMQ server


As everything with Ubuntu, this step is pretty trivial:

$ sudo apt-get install rabbitmq-server

The only requirement for this package is Erlang distribution. If you already have Erlang installed on your system, the installation of rabbitmq-server is a quick procedure. The following directories will be created during the installation:


/usr/lib/rabbitmq/binexecutables added to the path
/usr/lib/erlang/lib/rabbitmq_server-1.x.xcompiled modules
/var/lib/rabbitmq/mnesiapersistent storage for messages
/var/log/rabbitmqlog files (e.g. startup_log, rabbit.log)

After installation is finished the RabbitMQ server is started and listens to incoming requests on port 5672. You can check /var/log/rabbitmq/startup_log file to see if everything was ok.

Groovy clients


I followed official Java client API to build two scripts: consumer.groovy
import com.rabbitmq.client.*

@Grab(group='com.rabbitmq', module='amqp-client', version='1.7.2')
params = new ConnectionParameters(
username: 'guest',
password: 'guest',
virtualHost: '/',
requestedHeartbeat: 0
)
factory = new ConnectionFactory(params)
conn = factory.newConnection('lab.ndpar.com', 5672)
channel = conn.createChannel()

exchangeName = 'myExchange'; queueName = 'myQueue'

channel.exchangeDeclare exchangeName, 'direct'
channel.queueDeclare queueName
channel.queueBind queueName, exchangeName, 'myRoutingKey'

def consumer = new QueueingConsumer(channel)
channel.basicConsume queueName, false, consumer

while (true) {
delivery = consumer.nextDelivery()
println "Received message: ${new String(delivery.body)}"
channel.basicAck delivery.envelope.deliveryTag, false
}
channel.close()
conn.close()

and publisher.groovy
import com.rabbitmq.client.*

@Grab(group='com.rabbitmq', module='amqp-client', version='1.7.2')
params = new ConnectionParameters(
username: 'guest',
password: 'guest',
virtualHost: '/',
requestedHeartbeat: 0
)
factory = new ConnectionFactory(params)
conn = factory.newConnection('lab.ndpar.com', 5672)
channel = conn.createChannel()

channel.basicPublish 'myExchange', 'myRoutingKey', null, "Hello, world!".bytes

channel.close()
conn.close()

Now start consumer in one terminal window
$ groovy consumer.groovy

and run publisher in another:
$ groovy publisher.groovy

On the consumer window you should see Received message: Hello, world! text, which means RabbitMQ works correctly.

Monitoring logs


You can check RabbitMQ logs by doing tail -f /var/log/rabbitmq/rabbit.log For example, starting the consumer results the following log entries:
=INFO REPORT==== 14-Mar-2010::11:20:53 ===
accepted TCP connection on 0.0.0.0:5672 from 192.168.2.10:62424

=INFO REPORT==== 14-Mar-2010::11:20:53 ===
starting TCP connection <0.24154.1> from 192.168.2.10:62424

Running the publisher:
=INFO REPORT==== 14-Mar-2010::11:22:08 ===
accepted TCP connection on 0.0.0.0:5672 from 192.168.2.10:62432

=INFO REPORT==== 14-Mar-2010::11:22:08 ===
starting TCP connection <0.24232.1> from 192.168.2.10:62432

=INFO REPORT==== 14-Mar-2010::11:22:08 ===
closing TCP connection <0.24232.1> from 192.168.2.10:62432

Now if we terminate the consumer by ^C there will be a warning
=WARNING REPORT==== 14-Mar-2010::11:25:03 ===
exception on TCP connection <0.24154.1> from 192.168.2.10:62424
connection_closed_abruptly

=INFO REPORT==== 14-Mar-2010::11:25:03 ===
closing TCP connection <0.24154.1> from 192.168.2.10:62424

but the connection is closed properly by the server.

That's it for now. Stay tuned for the future updates on my RabbitMQ experience.

Links


• Rapid application prototyping with Groovy DSL